自己动手写操作系统-Bochs安装及使用
本文下载的bochs版本为2.6.9:https://sourceforge.net/projects/bochs/files/bochs/2.6.9/ 安装时出现如下问题:
- 配置
$ ./configure --enable-debugger --enable-disasm
错误提示:
ERROR: X windows gui was selected, but X windows libraries were not found.
出现这个错误时,请安装xorg-dev包
sudo apt-get install xorg-dev
配置后执行:
make
sudo make install
- Bochs创建软盘映像
创建一个软盘映像:
tanwubin@tanwubin:~/Documents/OS-Orange/2.1.3/bochs-2.6.9$ bximage
========================================================================
                                bximage
  Disk Image Creation / Conversion / Resize and Commit Tool for Bochs
         $Id: bximage.cc 13069 2017-02-12 16:51:52Z vruppert $
========================================================================

1. Create new floppy or hard disk image
2. Convert hard disk image to other format (mode)
3. Resize hard disk image
4. Commit 'undoable' redolog to base image
5. Disk image info

0. Quit

Please choose one [0] 1

Create image

Do you want to create a floppy disk image or a hard disk image?
Please type hd or fd. [hd] fd

Choose the size of floppy disk image to create.
Please type 160k, 180k, 320k, 360k, 720k, 1.2M, 1.44M, 1.68M, 1.72M, or 2.88M.
 [1.44M]

What should be the name of the image?
[a.img]

Creating floppy image 'a.img' with 2880 sectors

The following line should appear in your bochsrc:
  floppya: image="a.img", status=inserted
- 引导扇区
	org 07c00h ; 告诉编译器程序加载到7c00处
	mov ax, cs
        mov ds, ax
        mov es, ax
        call DispStr ; 调用显示字符串例程
        jmp $ ; 无限循环
DispStr:
    	mov ax, BootMessage
     	mov bp, ax ; ES:BP = 串地址
     	mov cx, 16 ; CX = 串长度
     	mov ax, 01301h ; AH = 13, AL = 01h
     	mov bx, 000ch ; 页号为0 (BH = 0) 黑底红字(BL = 0Ch,高亮)
     	mov dl, 0
     	int 10h ; 10h 号中断
     	ret
BootMessage: db "Hello,OS world!"
times 510 - ($-$$) db 0 ; 填充剩下的空间,使生成的二进制代码恰好为512字节
dw 0xaa55 ; 结束标志
- 引导扇区编译
nasm boot.asm -o boot.bin
当前目录下文件列表如下:
tanwubin@tanwubin:~/Documents/OS-Orange/2.1.3$ ls
a.img   bochsrc  boot.asm  boot.bin
- 将引导扇区写进软盘中
$ dd if=boot.bin of=a.img bs=512 count=1 conv=notrunc
1+0 records in
1+0 records out
512 bytes copied, 0.000360334 s, 1.4 MB/s
其中: bs=512:bs是用来规划一个block的大小,如果未指定则默认是512Bytes(一个扇区的大小) count=1:多少个bs的意思 conv=notrunc:
如果不用它的话,软盘映像文件a.img会被截断(truncated),因为boot.bin比a.img小。
- Bochs配置如下
#Configuration file for Bochs

#how much memory the emulated machine will have
megs: 32

#filename of ROM images  $BXSHARE=/usr/local/share/bochs/
romimage: file=$BXSHARE/BIOS-bochs-latest
vgaromimage: file=$BXSHARE/VGABIOS-lgpl-latest

#what disk images will be used
floppya: 1_44=a.img, status=inserted

#choose the boot disk.
boot: floppy

#where do we send log messages
log: bochsout.txt

#disable the mouse
mouse: enabled=0

#enable key mapping, using US layout as default
keyboard_mapping: enabled=1, map=/usr/local/share/bochs/keymaps/x11-pc-us.map
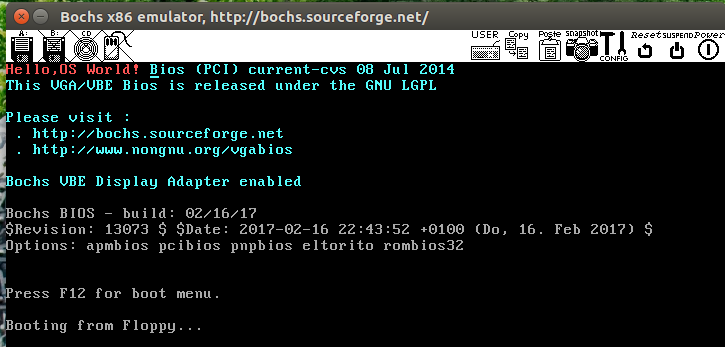
- Bochs启动
$ bochs
========================================================================
                       Bochs x86 Emulator 2.6.9
               Built from SVN snapshot on April 9, 2017
                  Compiled on Jan 16 2018 at 09:53:25
========================================================================
00000000000i[      ] BXSHARE not set. using compile time default '/usr/local/share/bochs'
00000000000i[      ] reading configuration from bochsrc
------------------------------
Bochs Configuration: Main Menu
------------------------------

This is the Bochs Configuration Interface, where you can describe the
machine that you want to simulate.  Bochs has already searched for a
configuration file (typically called bochsrc.txt) and loaded it if it
could be found.  When you are satisfied with the configuration, go
ahead and start the simulation.

You can also start bochs with the -q option to skip these menus.

1. Restore factory default configuration
2. Read options from...
3. Edit options
4. Save options to...
5. Restore the Bochs state from...
6. Begin simulation
7. Quit now

Please choose one: [6]
00000000000i[      ] installing x module as the Bochs GUI
00000000000i[      ] using log file bochsout.txt
Next at t=0
(0) [0x0000fffffff0] f000:fff0 (unk. ctxt): jmpf 0xf000:e05b          ; ea5be000f0
<bochs:1> c